| |

Difference between Autofilter and Advanced filter in Microsoft ExcelThe respective Autofilter as well as the Advanced Filter are termed to be the two powerful features that are made available in Microsoft Excel that primarily allow users to manage efficiently and also to analyze the data within a spreadsheet effectively. While they both serve the purpose of filtering out the data that are based upon some of the specific criteria, they usually differ in terms of complexity as well as functionality. AutofilterData Streamlining with the Ease: We all know that the respective "Autofilter" is basically termed to be a user-friendly tool that is mainly designed for quick as well as straightforward data filtering. Despite all this, it provides a simple way to narrow down the data within a column, which is based upon the specific conditions as well. For the purpose of applying the Autofilter function in Microsoft Excel, users can easily select the columns that contain the data they want to filter, and then we can make use of the filter dropdown menu in order to choose the specific criteria as well. This process enables users to display only the relevant information while temporarily hiding the rest effectively. However, one of the notable advantages of Autofilter is its ease of use. With just a few clicks, users can easily filter out the data to focus on particular values, ranges, or conditions effectively. In addition to this, Autofilter allows for multiple criteria within a single column, thus offering a degree of flexibility for basic data analysis respectively. Moreover, it is important to note that the respective Autofilter operates on a per-column basis, meaning users can easily filter out one of the columns at a time. While this simplicity is beneficial for quick tasks, it might be limiting for more complex filtering requirements effectively. Advanced FilterUnleashing Precision Filtering: On the other hand, the respective "Advanced Filter" usually takes the filtering of the data to the next level by just providing a more sophisticated as well as comprehensive set of options. Unlike Autofilter, Advanced Filter allows users to specify complex criteria, thus involving multiple columns easily. This is particularly useful for users who are actually dealing with intricate datasets and seeking highly customized filtering solutions as well. For the purpose of using the Advanced Filter, users need to set up the criteria range, a designated area by just specifying the filtering conditions, separate from the data. This range allows users to easily define out the intricate rules, combining criteria from the different columns. Once the criteria are set, users can easily apply the Advanced Filter to extract specific data that meets the specified conditions effectively. Despite all this, one of the key advantages of the Advanced Filter is its ability to create more intricate filtering logic, thus making it suitable for advanced data analysis tasks. This feature empowers users to perform operations like AND, OR, and NOT conditions, thus offering a higher level of precision while extracting specific data subsets. However, the trade-off for this advanced functionality is a steeper learning curve compared to the Autofilter. Users need to be familiar with setting up the criteria ranges and understanding the logical operators involved in creating complex filtering conditions. Choosing Between Autofilter and Advanced FilterMore often, the choice between the Autofilter as well as the Advanced Filter depends upon the complexity of our data analysis needs. If we are dealing with a relatively simple dataset and require quick column-based filtering, Autofilter is the go-to option for its user-friendly interface and ease of implementation. In contrast to this, for more intricate datasets and sophisticated filtering requirements involving multiple columns as well as complex conditions, Advanced Filter mainly provides the precision as well as flexibility that is effectively needed for in-depth data analysis. In practice, most of the users usually use both features, which dependdepend upon the nature of the task at hand. Mastering both Autofilter and also Advanced Filter equips users with a comprehensive toolkit for efficient data management and analysis in Microsoft Excel. What is Autofilter in Microsoft Excel?In Microsoft Excel, the respective "Auto-filter" is primarily termed as the powerful tool that is efficiently designed for the purpose of enhancing the management of the data as well as its analysis within spreadsheets. This feature provides a convenient mechanism for sorting and filtering the data effortlessly, streamlining the process of navigating through huge amounts of the datasets respectively. And in order to initiate the auto-filter, the respective users begin by just selecting the range of the cells they wish to filter within their Excel worksheet. Once the desired cells are highlighted, they can now easily navigate to the "Data" tab, where the "Filter" button is located as well. And by just clicking on this button it activates the auto-filter, and immediately, small dropdown arrows appear in the column headers of the selected range respectively. However, these dropdown arrows serve as the interactive controls, thus allowing users to apply various filters as well as the sorting options in order to the corresponding columns; by clicking on a specific arrow, a particular menu appears, presenting distinct filter criteria like text filters, number filters, and also date filters. Users can then choose specific parameters, and Excel dynamically adjusts the display, showing only the data that meets the specified conditions respectively. Despite all this, Auto-filtering is particularly beneficial while dealing with extensive datasets, as it enables the users to focus on the relevant information without manually sorting or scrolling through the entire dataset as well. This feature significantly enhances efficiency in tasks that mainly involve the analysis of the data, reporting of the data, and decision-making, contributing to a more streamlined and also organized approach to effectively working with Excel spreadsheets. List out the various Filter Options in AutoFilter available in Microsoft ExcelIt is well known that the respective AutoFilter in Microsoft Excel usually allows us to view specific rows while hiding the other rows as well. More often, when the Excel AutoFilter is added to the row's header, it gives us a dropdown menu in the header row. AutoFilter in Excel gives us multiple filter options, which are as follows:
Despite all this, the first four are the number of filters, while the remaining are effective text filters. How can one effectively make use of the Auto Filters in Microsoft Excel?So now in this, let us learn how to make use of the Microsoft Excel AutoFilters with the help of some good examples effectively: #Example 1: Use of Autofilter in Microsoft Excel It was well known that the respective real estate website has various property types of data, mainly including two things that are none other than residential and commercial. They have specific brokers and photographers who click on the images for those real estate properties respectively. More often, the company also maintains the picture count in the properties which are taken by the photographer effectively. Moreover, the task is to find which city has a picture count of 34 and which broker Vishal Yadav has that property. Step 1: Firstly, we will be clicking on any particular row header that is on row 1 respectively. 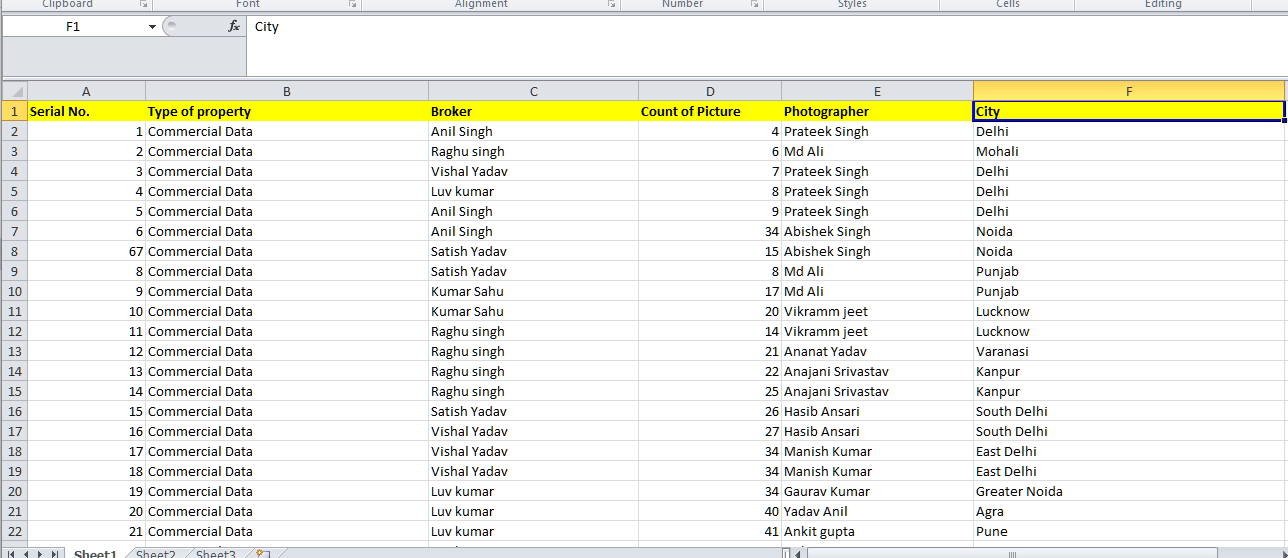
Step 2: Now after that, we are required to click on the "Filters" in the "Data" tab under the "Sort & Filter" section. 
Step 3: Now, the particular filter is mainly applied in the row header, effectively giving us a dropdown menu. 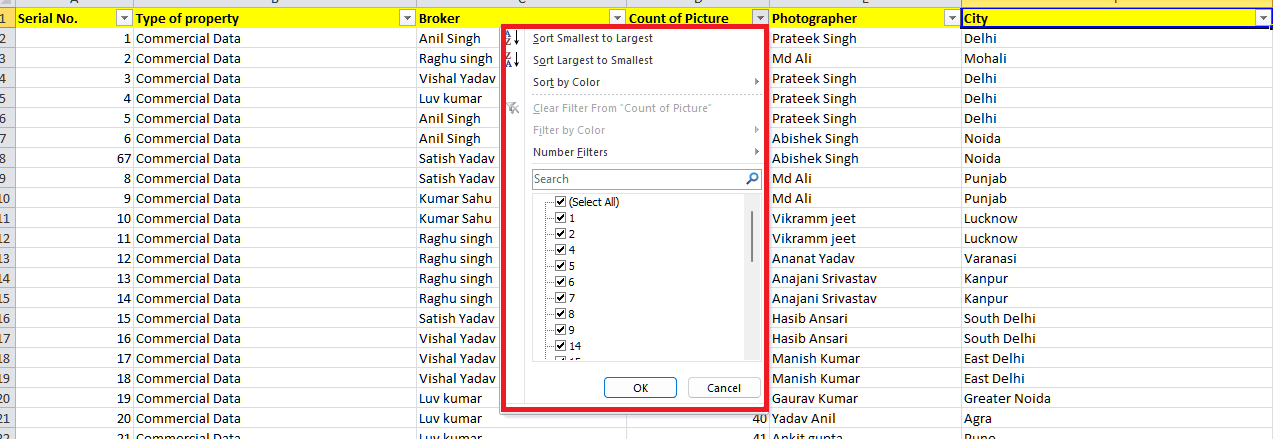
Step 4: In this step, we will unselect all the counts by unchecking select all and selecting 34 for the picture count, respectively. 
Step 4: Now, in this step, we are required to select the broker as "Vishal Yadav" by just unchecking select all and selecting except "Vishal Yadav" in the "Broker" column. 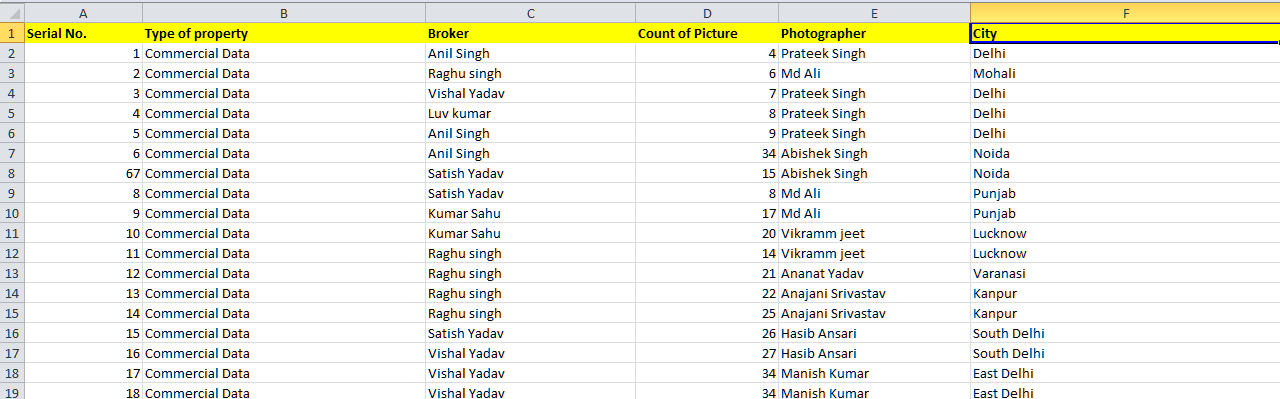
Our cities have 34 pictures, and broker "Vishal Yadav" has those properties. 
More often, we have chipped our data by using the Microsoft Excel AutoFilter. Therefore, the data that did not meet our criteria, i.e., picture count other than 34 or broker other than "Vishal Yadav" is hidden as well. We have our desired data as we wanted. # Example 2: AutoFilter in Excel This particular data depicts that some of the students have scored marks in their annual exams in a teacher's class. With this specific dataset, the respective teacher usually wants to know which particular student has eventually scored marks above 50 in the subjects of math and whose total is above 400 as well. 
# Example 3: AutoFilter in Microsoft Excel So, in the continuation with example 2, we can also make use of the custom filter in an effective manner: But first of all, we will know what is meant by a "Custom Filter"? A "Custom Filter" is termed to be an Excel filter option that primarily allows us to put out some certain or specific conditions in order to get our values without getting any error.
So, with this example, now let us learn about custom filters.
Write 50 in the box where there is the text "is greater than."
What is Advanced Filter in Microsoft Excel?In Microsoft Excel, the respective "Advanced filtering" is primarily termed to be the powerful feature that is efficiently designed for the purpose of enhancing the analysis of the data by just providing a sophisticated method to refine and extract some of the specific information from the selected dataset as well. In spite of this, going beyond the basic functionalities of standard filtering, advanced filtering enables users to set complex criteria, allowing for a more nuanced and targeted approach to the manipulation of the data. Moreover, for the purpose of initiating advanced filtering, users start by just selecting the range of the cells that constitute their dataset within an Excel spreadsheet. Moving to the "Data" tab on the Excel ribbon, users find the "Sort & Filter" option and then will click on it to unveil a menu, where they can select "Advanced Filter." Within the Advanced Filter dialog box, the respective users will encounter the three main sections, which are as follows: "List range," "Criteria range," and "Copy to." The "List range" designates the initial data range selected by the user. In the "Criteria range," users specify out the some of the basic conditions that the selected data must meet needs to be included in the filtered outcome. These conditions can range from simple comparisons, such as greater than or equal to, to more complex logical operators like AND and OR. The inclusion of the logical operators adds a layer of sophistication to the filtering process. Users can, for example, filter data based on transactions that occurred after a specific date AND have a value greater than a particular amount. This flexibility makes advanced filtering an invaluable tool for the users who all were effectively dealing with the intricate datasets. In the "Copy to" section, users will decide whether to copy the filtered data to a new location within the same sheet or to another sheet as well. This feature is quite beneficial when the users want to preserve the original dataset while working with the refined results effectively. Despite all this, it is very much essential to ensure that the criteria specified in the "Criteria range" align with the structure of the data. Microsoft Excel usually analyzes each row based on these criteria, displaying only the rows that meet the specified conditions. Once configurations are set, users click "OK," and Excel promptly applies the advanced filter to the dataset, presenting the filtered results. How can one effectively make use of the Advanced Filter in Microsoft Excel?Here in this part, we will learn how one can effectively make use of the advanced filter effectively, by using some of the specific examples. # Example 1: Let us now assume that we have some of the following data to be filtered based upon the different criteria, which are as seen below: 
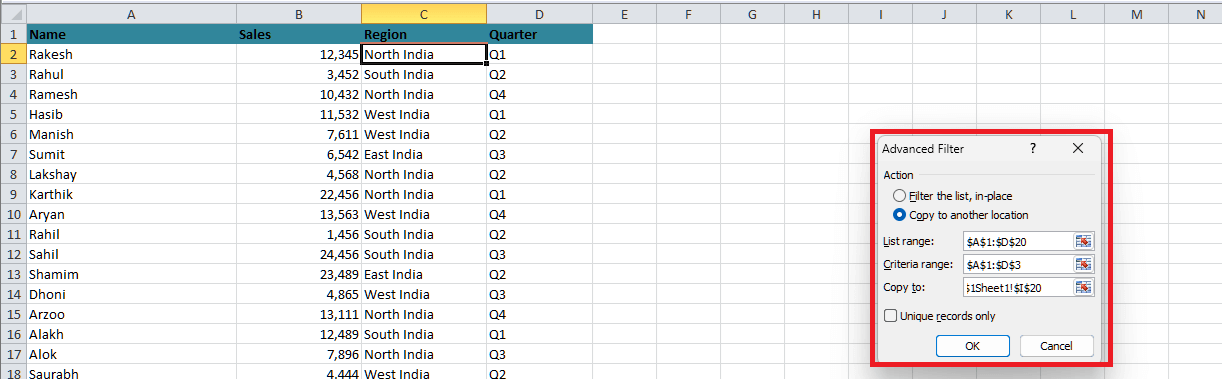
And for this, we must need to check the transaction sales which are made by "Hasib" and "Manish." Then, we can make use of the OR operator, thus displaying the records that primarily satisfy any of the conditions effectively. And just after this, we can now follow down the basic steps to apply these particular filters in an Excel Sheet to get the better output as well. Below are the mentioned steps that can be used for the purpose of applying an advanced filter in an Excel sheet respectively: - Step 1: First, to use an advanced filter, we are required to select any cell in the given range of the data. 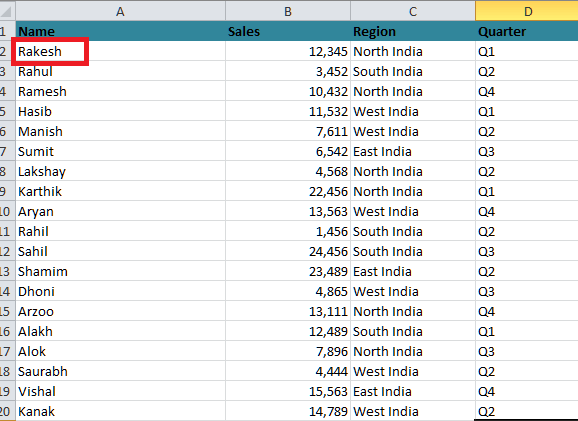
Step 2: Now, in this particular step, we are required to click on the "Data tab" - "Sort & Filter" group - "Advanced" command. 
Step 3: As we click on "Advanced," a respective dialog box that is none other than the "Advanced Filter" will open on our screen, as will asking for the "List Range" to filter, "Criteria Range" for the purpose of defining out the criteria, and the "Extract Range" for the purpose of copying out the filtered data (if desired in any of the case). 
Step 4: Now, in this step, for the respective "Criteria Range," we need to copy the column headings on the top row and also define the criteria below the field heading. And in order to specify the criteria, we can efficiently make use of the comparison operator, which is as follows: 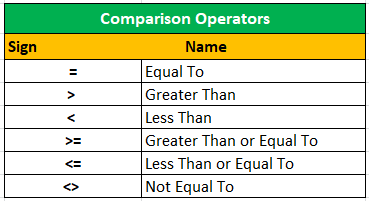
Step 5: We want to get all the records having the name 'Hasib' or 'Manish.' The Criteria Range would be like below: 
More often, for the "OR" conditions where we actually want to display the records that usually satisfy any of the specific requirements, we must specify the criteria in the different rows as well. There are two actions in an advanced filter.
Despite this, we can effectively use any option according to our needs, but here, we will use the second option more often. Now, we need to:
# Example 2: Use of Advanced Excel Filter choosing criteria with the numbers. We can also use the advanced filter to filter out the data that are actually based on numerical logic.
More often, for instance, we have constructed the sales data in an Excel spreadsheet as depicted below: 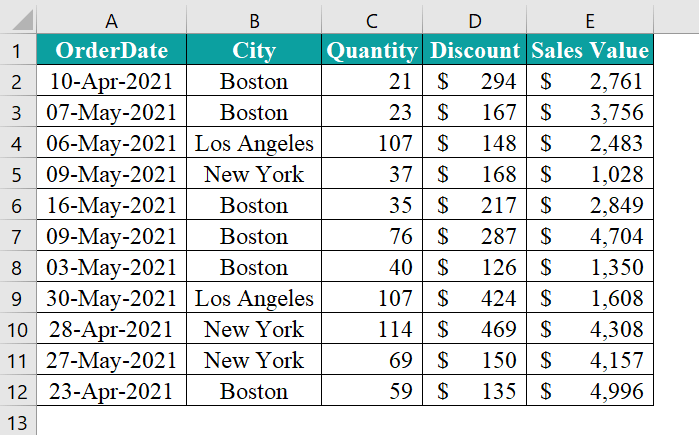
As from the above table, we are required to filter out the respective fields in which the quantity is >50 and the sales value is <4500. Step 1: First of all, we are required to create a criteria table like the following ones. 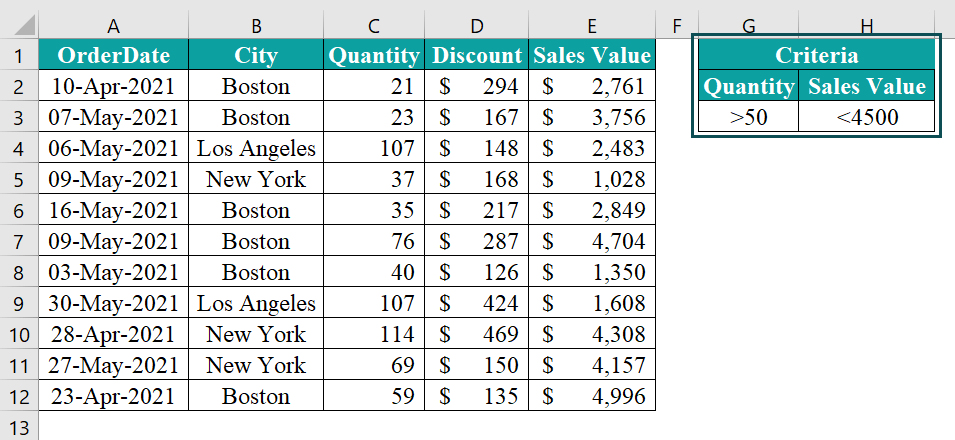
Step 2: After creating the table, we just need to go to the Data tab, which is available under the Sort & Filter option. Then, we are required to click on the Advanced options as well. 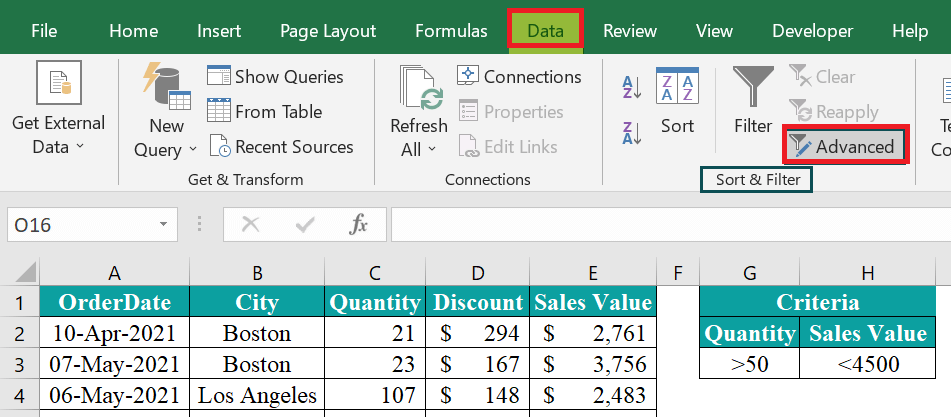
Step 3: Just after performing the above steps, the Advanced Filter window will appear. We are required to choose Copy to another location and then choose the listed ranges, which usually range from cell A1:E12. 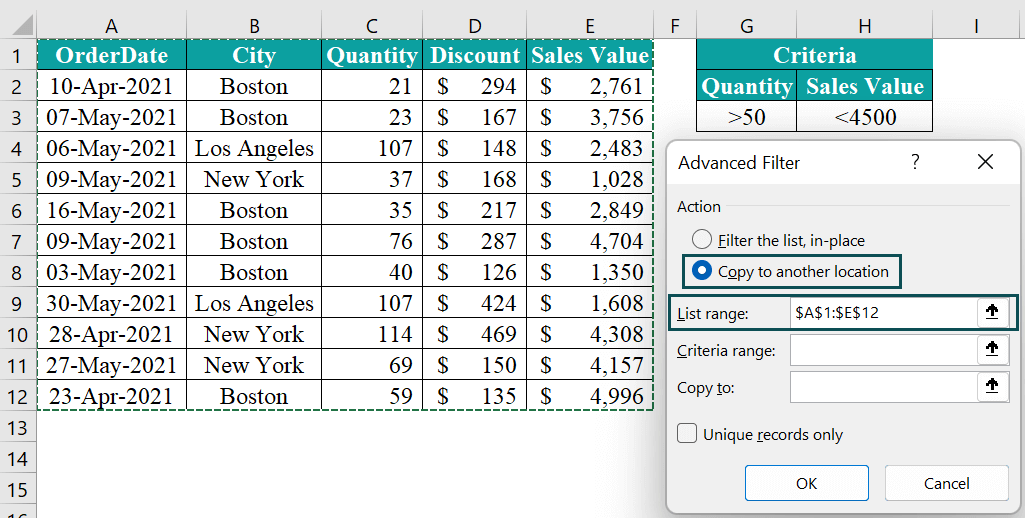
Step 4: Now, in this step, we need to choose the criteria to range from cell G2 to H3. 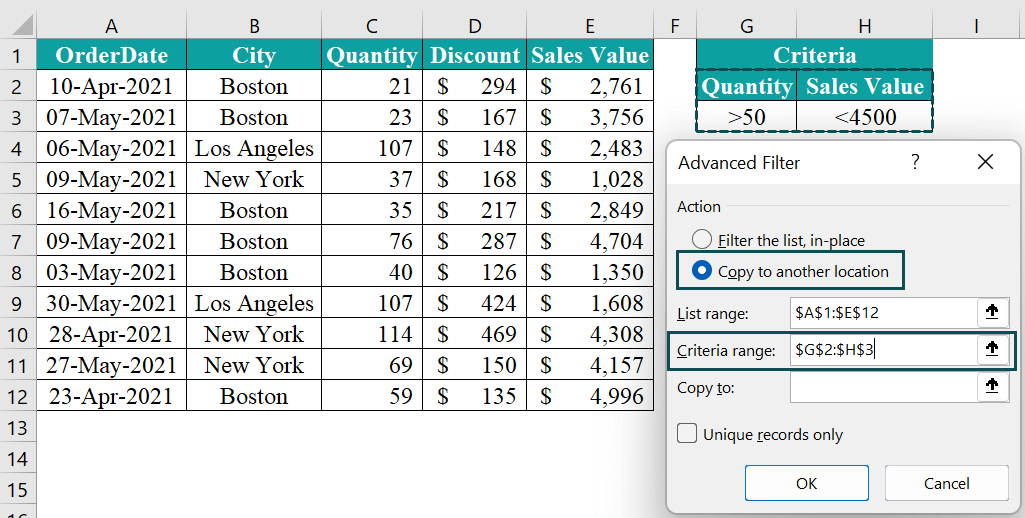
Step 5: Choose the Copy to location as any empty cells. 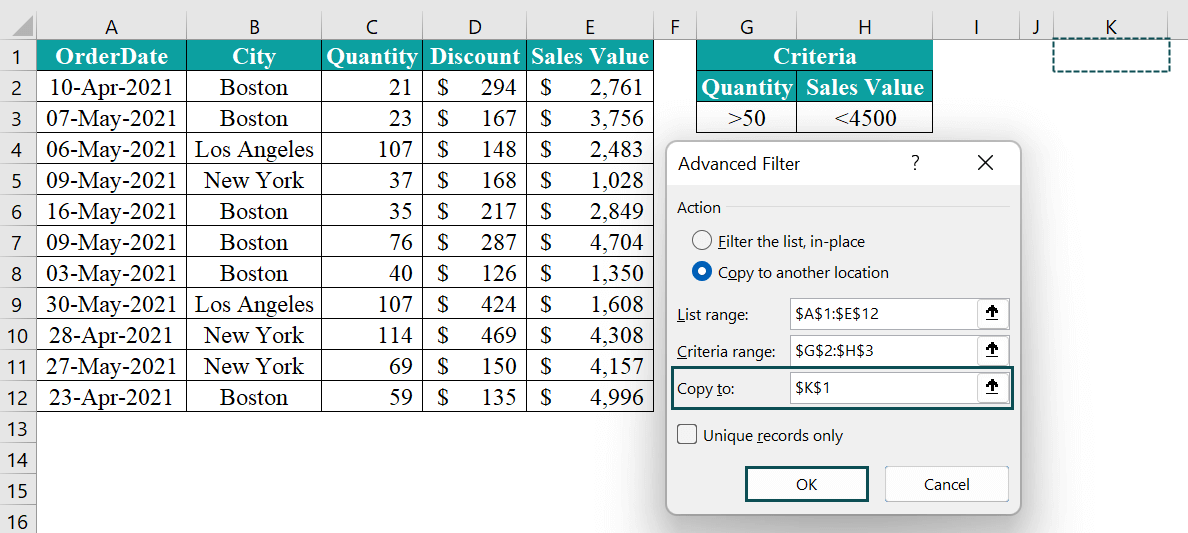
Step 6: After that, we are required to click on the OK button. We will have rows filtered based on the given criteria as well. 
And it has eventually filtered out where the quantity is >50 and the sales value is <4500. # Example 3: Use of the advanced filter with the help of the Wildcard. We all knew that with the help of the advanced filter works with the use of "wildcard" characters as well. We have some of the following wildcard characters, we can make use of the advanced filter as well.
And despite all this, we have the following fruit sales data in an Excel spreadsheet that are as depicted below: 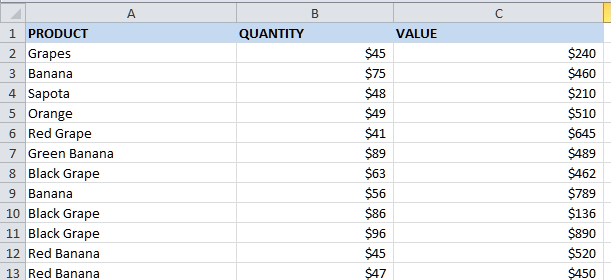
Step 1: First of all, we will be making use of the various wildcard characters in order to filter out the data by just making use of an advanced filter, and for this, we have the following criteria in order to set up in the criteria field. 
*Banana*: Here in this part, we have made used of an asterisk (*) sign on either side of letter "Banana," and more often the asterisk sign will effectively match any number of the characters on either side of the Banana respectively. Step 2: In this step, we will be opening out the advanced filter and then will apply the necessary fields, like as those mentioned below. 
Step 3: And just after performing the above steps, we will be clicking on the OK option. 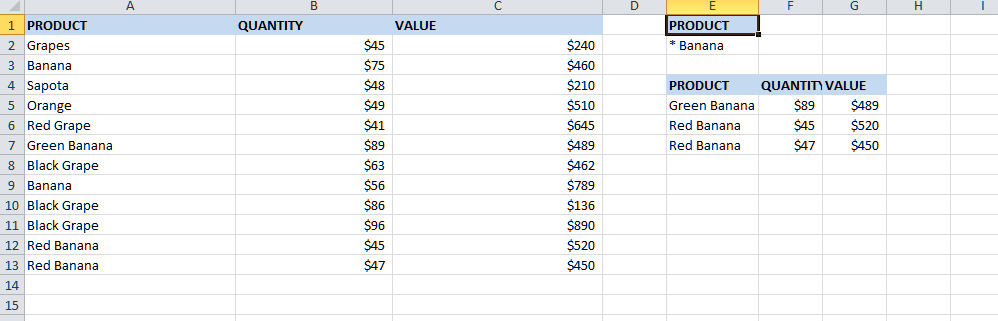
Step 4: Then, the respective advanced filter will effectively filter out all the products containing the word 'Banana'. 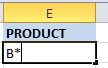
Step 5: Now, just after performing the above step, we will apply the advanced filter, as it was clearly depicted in the image below. 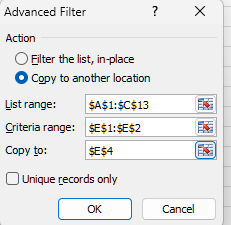
At last, we will be clicking on the OK options and will get encountered with the following list filtered effectively. 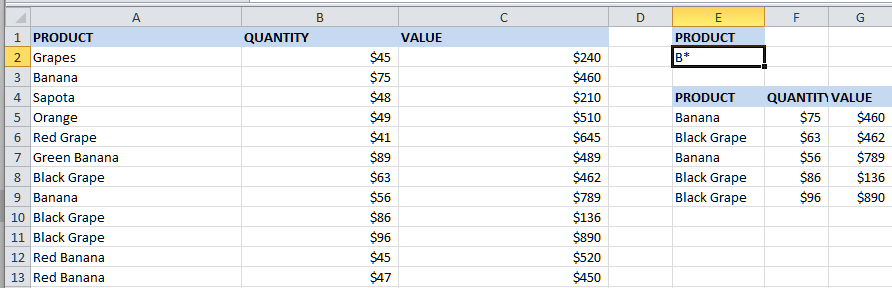
It has filtered all the product names which are efficiently starting with the word 'B,' and in this way, by just making use of the wildcard characters, we can easily filter out the partial matching of the data. # Example 4: Use of the Advanced Filter with the help of the Formulas. Now, we will continue this part using the same data that we used in Example 4. Here, we have modified the respective data with the current month's sales and also with the previous month's sales. 
Now we will be moving forward, by just making use of the formulas in the advanced filter. And for instance, we must need to filter out all the rows in which the current month's sales are more than the previous months, sales values, and in order to achieve this, we are required to set up criteria like the following ones: 
Step 1: Here in this dataset, we have applied the simple logical formula for the purpose of checking out whether the current month's sales, which are present in cell C2, are greater than the previous month's sales in cell D2 or not. And in this, the very first value of the data condition is true and on the basis of this we can easily apply advanced filter in the selected sheet effectively. 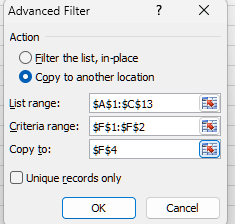
Step 2: Now in this particular step, we will be now clicking on the OK options, which will filter all the specific rows where the current month's sales are note more than the previous month's sales. 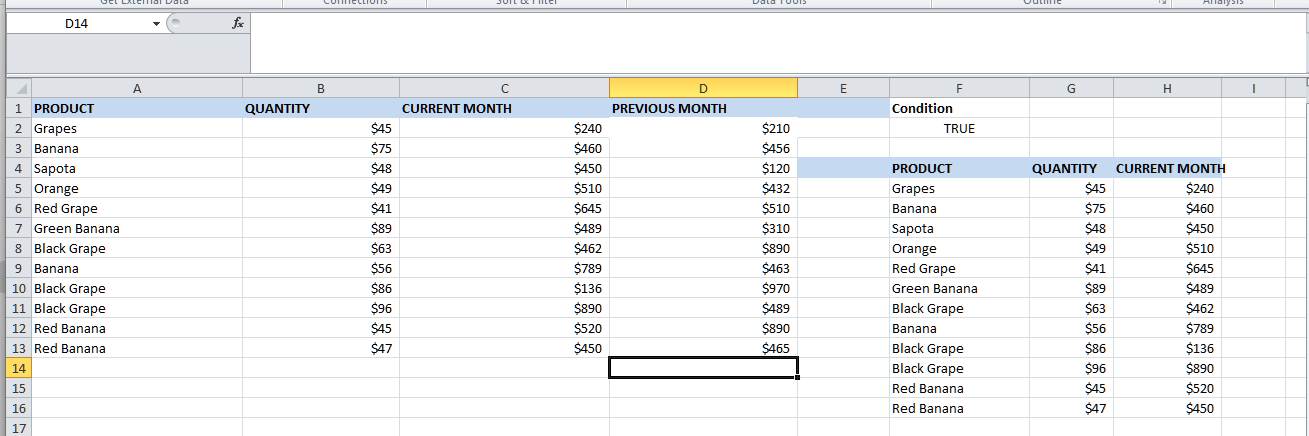
Next TopicExcel Help
|


 For Videos Join Our Youtube Channel: Join Now
Feedback
- Send your Feedback to [email protected]
Help Others, Please Share


